How to read a light meter film camera, adjust the ISO, shutter speed, and aperture until the light metre indicates the correct exposure. Reading a light metre on a film camera can be overwhelming at first, but with practice, it becomes second nature.
The light metre measures the brightness of light in a scene and suggests settings for the camera. Understanding how to use a light metre is essential for proper exposure and taking high-quality photos. This guide will explain how to read a light metre on a film camera and provide tips to improve your photography skills.
The Parts Of A LightMeter Film Camera
One of the most important things to know when using a film camera with a light metre is the different parts of the camera. Understanding how each part works and how it works together will help you take better photos and get the most out of your camera. In this article, we’ll go over the three main parts of a metered film camera: the metre, the camera body, and the film.
Light Meter Film Camera
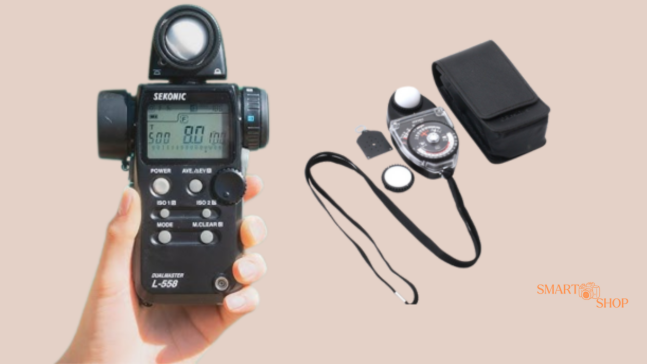
The light metre is a small device, usually located inside the camera body or on the top panel, that measures the amount of light in a scene. It is essential to understand that light metres do not measure actual light but reflect light. When you take a reading with your light metre, you measure how much light reflects off the subject and return to the camera.
There are two main types of photometers: incident and reflective. Incident light metres measure the amount of light that hits the subject, while reflective light metres measure the amount of light that reflects off the subject. Most film camera light metres are reflective, which is essential to keep in mind when taking a reading.
The Camera
The camera body is where all the other parts of the camera come together to capture the image. The lens is placed on the front of the camera body, and the viewfinder is usually located on the top panel. The camera body contains the shutter, which controls how long light can enter the camera and reach the film. When you press the shutter button, the shutter opens and closes, exposing the film to light for a specific period.
The camera body also contains the aperture, which is the opening that controls the amount of light that enters the camera. Depending on the camera model, the aperture can be adjusted manually or automatically. Finally, the camera body also has a film advance lever or knob that is used to move the film to the next frame.
The Film
The film is the last piece of the puzzle when it comes to capturing an image with a light-metre film camera. Films come in different types and speeds, which determines their light sensitivity. For example, a movie with a higher speed (ISO) rating is more sensitive to light than a film with a lower speed. The film is also where the image is recorded, where the light from the scene is captured on the film as it is exposed through the lens.
In conclusion, understanding the different parts of a light-metre film camera is essential to taking good photographs. By knowing how the light metre, camera body, and film work together, you’ll be able to adjust your camera settings and capture sharp, well-exposed images.
Types Of Light Metres
Light metres are essential tools for photographers when measuring the amount of light in a given scene. By understanding how to use a light metre, you can ensure that your photos are exposed correctly, resulting in the perfect shot. There are two types of photometers: incident photometers and reflected photometers.
Incident Light Meter Film Camera
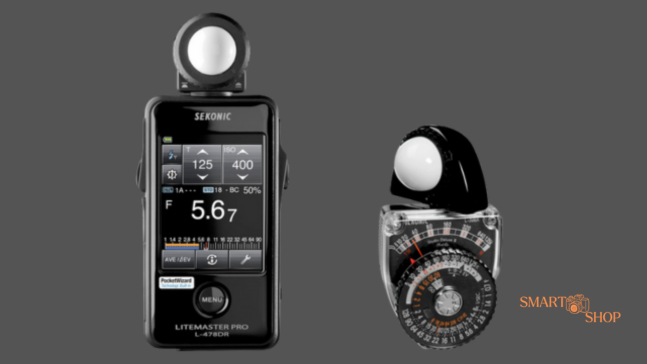
An incident photometer measures the amount of light that falls on the subject. These light metres are placed in front of the subject, and the reading is taken from the white dome of the metre. This light metre provides the most accurate reading, measuring the light falling on the subject rather than the light reflected from the subject’s surface.
| Pros | Cons |
| Measures the light falling on the subject, providing an accurate reading | Requires you to stand close to the subject to take the measurement |
| Ideal for outdoor photography as it takes into account the direction and intensity of the light falling on the subject | Cannot be used if you don’t have access to the subject |
Reflected Light Metres
On the other hand, a reflected light metre measures the amount of light reflected from the subject. The most common type of reflected light metre is the built-in metre found on most film cameras. The metre sensor is on the camera and reads light reflecting off the subject’s surface.
- Advantages:
- It can take measurements from a distance, making it ideal for situations where you can’t stay close to your subject.
- It offers different metering modes, including spot metering and centre-weighted metering, allowing for greater control over exposure.
- Cons:
- It may be affected by the colour and reflectivity of the subject’s surface, resulting in inaccurate readings.
- It does not consider the direction and intensity of light hitting the subject, resulting in lower accuracy in certain lighting conditions.
Understanding the types of light metres is essential when taking the perfect photo. Knowing the pros and cons of each light metre, you can choose the one that suits your specific needs and shooting conditions.
How To Use A Light Metre
To read a light metre on a film camera, ensure the metre is turned on and set to the correct ISO of the film being used. Hold the metre toward the subject, point the sensor at the light source, and take a reading.
Adjust your camera’s aperture and shutter speed for proper exposure based on the metre reading.
Filming with a film camera can be challenging but rewarding. Unlike digital cameras, film cameras require manual adjustments to get the perfect exposure for every shot. An essential tool for getting the correct exposure is a light metre. In this guide, we’ll explain a light metre and how you can use it to take beautifully exposed photos with your film camera.
Step One: Set The Film Speed
Before you can use the light metre, you will need to set the film speed. This setting tells the metre how sensitive your film is to light. Most films have an ISO rating of 100 and 400, although higher and lower speeds are available. To set the film speed, locate the ISO dial on your camera and adjust it to the appropriate setting for your film.
Step Two: Measure The Light
You are ready to measure light once you have set the film speed. Hold the camera toward the subject, point the metre at the light source, and press the button to take a reading. The light metre will give you an exposure value (EV) that you can use to adjust your camera settings.
Step Three: Adjust The Settings
Now that you have your electric vehicle, it’s time to adjust your camera settings. You can change three settings to get the correct exposure: aperture, shutter speed, and ISO. Depending on the camera you are using, you may need to manually adjust some or all of these settings. Use the EV to calculate the correct aperture, shutter speed, or ISO to change your settings. For example, if your light metre gives you an EV of 12, you can set the aperture to f/8 and the shutter speed to 1/125th of a second, or you can set the ISO to a higher or lower value.
Step Four: Take The Photo
Once you’ve adjusted the settings, it’s time to take the photo. Ensure your camera is focused correctly, and then press the shutter button to take the picture. After you have taken the photo, check your negative to see if the exposure is correct. If it is too dark or bright, adjust the settings and try again until you get the desired exposure. Using a light metre may seem daunting at first, but with practice, you’ll be able to take beautifully exposed photos that capture the mood and feel of your subject. So grab your camera, set your film speed, and measure light. You’ll be amazed at the photographs you can create with a little effort and knowledge.
Tips For Reading A Light Meter
If you have a film camera without a built-in light metre, you may find it overwhelming to take photos without one. However, by investing in a standalone light metre and spending some time learning how to read it, you will be able to gain more control over your photography and achieve better exposure for your shots.
Understanding Exposure
Before you begin using a light metre to adjust your camera settings, it is essential to understand the basics of exposure. Exposure refers to the amount of light that enters your camera and determines how bright or dark your photos will look. The three main factors that affect exposure are:
| Aperture | The size of the opening in the lens through which light passes. Measured in f-stops (e.g. f/2.8, f/5.6, f/11). |
| Shutter Speed | The amount of time that the camera’s shutter is open, allowing light to enter. Measured in fractions of a second (e.g. 1/60, 1/125, 1/250). |
| ISO | The camera’s sensitivity to light. The higher the ISO, the more sensitive the camera is to light, making it easier to shoot in low-light conditions. However, high ISO can also result in more noise or grain in your photos. |
When you adjust any of these three settings, you must compensate with the other two to maintain the correct exposure for the shot.
Taking Multiple Readings
When using a standalone light metre, you must take several readings to determine the correct exposure for your shot. To do this:
- Take a photo of your subject with your camera.
- Point the metre at the same point on the subject and measure the light.
- Adjust the settings on the light metre until it indicates the correct exposure based on your camera settings.
- Change your camera settings and retake the photo.
Repeat this process until your light metre indicates the correct exposure for the shot.
Adjusting For Different Lighting Conditions
One of the most challenging aspects of reading a light metre is adjusting the settings based on different lighting conditions. In general, bright scenes require a faster shutter speed or smaller aperture, while dark scenes need a slower shutter speed or wider aperture.
However, you may need creative exposure techniques in some situations to achieve the desired effect. For example, you can intentionally underexpose a shot by one or two stops to create a dramatic or moody look or overexpose a shot for a softer, dreamlike effect.
By mastering the art of reading a light metre, you can fully control your photography and create stunning images with your film camera.
Light Meter Film Camera Mistakes To Avoid
If you’re new to using a film camera, reading the light metre correctly can seem daunting. However, with some practice and knowledge, it is easy to master. Avoiding common mistakes can help you get the most out of your light metre in different lighting conditions. In this post, we’ll explore common mistakes to avoid when reading a light metre on a film camera.
Not Setting The Film Speed
One of the most common mistakes beginners make is not setting the correct film speed. Most light metres rely on this information to provide accurate readings. This setting is critical when using film with a different ISO rating than the camera setting. It is essential to adjust the film speed to avoid over- or under-exposure of the film and an unusable image. Be sure to double-check these settings before taking photos.
Using The Wrong Light Meter Mode
Another common mistake is using the wrong measurement mode. Camera light metres can typically be set to measure light in average, centre-weighted, or spot mode. Each mode has its specific use, and incorrect settings can produce inaccurate readings. To avoid mistakes, learn the different metering modes and choose the one that best suits the situation and subject you are photographing.
Not Adjusting For Different Lighting Conditions
Lighting conditions can change dramatically depending on the time of day, environment or weather. Please adjust your metre readings to accommodate these changes and avoid incorrect exposures. Remember that light metres measure the amount of light reflected off the subject and not the topic itself. Therefore, bright or light-coloured surfaces may reflect more light than darker surfaces, resulting in overexposure. Use exposure compensation to adjust for these variations and get accurate light readings.
Wrap Up
Reading a light metre on a film camera can be tricky, especially when starting. However, avoiding common mistakes can save you time, movies, and frustration. By setting the correct film speed, using the correct metering mode, and adjusting for different lighting conditions, you can master light metering and quickly improve the quality of your film-based images. Happy shooting!
Frequently Asked Questions For How To Read A Light Meter Film Camera
How Do You Read A Light Metre On A Film Camera?
To read a light metre on a film camera, point the camera at the subject and adjust the aperture and shutter speed until the metre indicates centre. The metre indicates the correct exposure based on the light of the scene.
How Do You Use A Light Metre On A Film Set?
On a film set, a light metre measures the intensity of light falling on the subject being filmed. To use it, hold the metre facing the light source, set the appropriate ISO setting, and take a reading by pressing the metre’s button.
This will give you the correct exposure settings for your camera.
Is Light Meter Film Camera Important In Film Camera?
Yes, a light metre is essential for film cameras. It helps measure light intensity, allowing you to choose the correct aperture, shutter speed and ISO values for your photographs. This ensures accurate exposure and better image quality.
How Does A Light Metre Work In A Camera?
A light metre in a camera measures the amount of light in a scene and helps determine the correct exposure settings. The metre calculates brightness and recommends the appropriate shutter speed and aperture values to capture a well-exposed image.
What Is A Light Meter Film Camera?
A light metre is an electronic device that measures the light in a scene to determine the correct exposure settings.
Conclusion
Understanding how to read a light metre on a film camera is a valuable skill for photographers looking to master the art of film photography. By learning how to read light and expose film correctly, you can achieve the desired results in your photographs.
Remember to always use a light metre, take several readings, and adjust accordingly. Practice makes perfect, and with patience, you will master using a light metre on your film camera. Happy shooting!

Pingback: Can You Wear Earbuds With Hearing Aids